Developed
by Pix4D SA as a web-based standalone product for Microsoft Windows, Pix4D is one
of the current premier software for photogrammetry. It’s many applications
include creating professional orthomosaics, constructing point clouds, generating
models and more. With it’s simple layout and automated tools, it is incredibly
easy to use. The proper background knowledge is necessary to understand the
information that is being generated and to ensure that the tools are used
correctly and the results interpreted ethically.
Photogrammetry
is the technique to extract geometric information from two-dimensional images
or video. For a comparison of photogrammetry software, click here.
This
post contains:
- A basic introduction to the Pix4D software
- A brief tutorial for performing basic functions in Pix4D Mapper
- A final overview of the software with links on where to find more information
Introduction to Pix4D
 |
| Figure 1 The illustrated workflow of Pix4D software. Source: Pix4D User Manual |
- CAPTURE: The user can capture an image with any digital camera or use Pix4Dcapture flight planning app on your mobile or tablet for drone field operations, flight review, and optimal data capture.
- PROCESS: Choose offline processing on Pix4D desktop for full control over data, without needing an internet connection. Choose online processing for fully automated, hardware free results on Pix4D cloud.
- ANALYZE: On desktop, gain access to advanced editing features, quality control, and measurements. For the cloud, monitor projects over time, use the drawing overlay for construction, and automatic NDVI map for agriculture.
- SHARE: Easily collaborate and annotate projects online, then share maps, models, and analytics with a simple URL.
Data Acquisition
The images that form the dataset must be obtained in the
field before using Pix4Dmapper. It is recommended to use images that have geolocation
and Ground Control Points (GCPs) for more accurate results.
In order to take a good dataset, there are four steps:
1. Design an Image Acquisition Plan: Considering key details ahead of time will mitigate problems and ensure that data collection is as thorough and efficient as possible. Is the project aerial, terrestrial, or mixed? What type of terrain or object will be photographed? What type of camera will be used? At what rate will the images be taken? What is the ideal flight height and angle? Draw out a path for ideal image collection. For aerial projects, this includes selecting the corridor path or regular and/or circular grid. Always keep the purpose of the project in mind.
2. Configure the camera settings: Wrong configuration can result in images with blur, noise, distortions, etc. There are specific requirements necessary to collect agricultural data, etc. so the specific project type should be researched ahead of time to avoid any problems.
3. Georeference the images: While this step is considered optional, it is highly recommended to avoid data mishaps later. The images can be georeferenced using a camera with built-in GPS or by external GPS devices.
4. Getting Ground Control Points (GCPs) on the field or through other sources: Again, though optional, this step is recommended to ensure data accuracy. Plan how many GCPs have to be acquired and include their measurement in the Data Acquisition Plan.
What are the recommended hardware and software requirements?
Windows
7, 8, 10 64 bits is recommended, as is a CPU quad-core or hexa-core Intel
i7/Xeon. Your computer should be GeForce GPU compatible with OpenGL 3.2 and 2
GB RAM. Solid-state hard-drives are best.
- Small projects (under 100 images at 14 MP): 8 GB RAM, 15 GB SSD Free Space.
- Medium projects (between 100 and 500 images at 14 MP): 16GB RAM, 30 GB SSD Free Space.
- Large projects (over 500 images at 14 MP): 32 GB RAM, 60 GB SSD Free Space.
- Very Large projects (over 2000 images at 14 MP): 32 GB RAM, 120 GB SSD Free Space.
What is the overlap needed for Pix4D to process imagery?
At least 75% frontal overlap is required for most
cases and at least 60% side overlap, though the desire percentage changes
depending in the terrain type. This detail requires careful planning. The image
acquisition plan depends on the required Ground Sampling Distance (GSD) in the
project specifications. The GSD will define the flight height at which the
images have to be taken. This is heavily dependent on the project specifications
and the terrain type or object to be reconstructed.
Nowadays, advanced Unmanned Aerial Vehicles (UAVs)
come with very good software that can design the image acquisition plan
automatically when given some parameters. These smart little robots can
automatically take the required images according to the selected acquisition
plan with no need for the user to intervene.
What if the user is flying over sand, snow, or uniform fields?
The generally
recommended flight path can be seen in Figure 2. Modifications on this path
can be made for different types of terrain. For example, flat terrain with
homogeneous visual content such as agriculture fields requires a frontal
overlap of at least 85% between images and at least 70% side overlap. For this
type of terrain, flying higher improves the results. Having accurate image
geolocation is necessary and use of the Agriculture template is recommended
(click here for more details).
For snow and sand, at least 85% frontal overlap and 70% side
overlap is again recommended. To avoid washout, it is important to set the
exposure settings to get as much contrast as possible.
 |
| Figure 2 This graphic demonstrates the flight path. over the area of interest. Each red circle represents an image that was taken during the flight. Overlap is necessary to piece the images together into a cohesive map of the area. |
What is Rapid Check?
Rapid Check is a program that runs inside of Pix4D and is
used as an alternative initial processing system where accuracy is traded for
speed. It processes quickly in an effort to determine whether sufficient
coverage was obtained, but the result has fairly low accuracy. The rapid check
is for field use to verify whether the proper areas and coverage of data were
attained.
Can Pix4D process multiple flights?
Yes, Pix4Dmapper can process images taken from
multiple flights provided that four factors are accounted for:
- The same flight height is maintained
- Each plan captures the images with enough overlap
- The image acquisition plans overlap one another adequately (Fig.3)(Fig.4)
- The flights are taken under very similar conditions (sun direction, weather conditions, no new buildings, etc.)
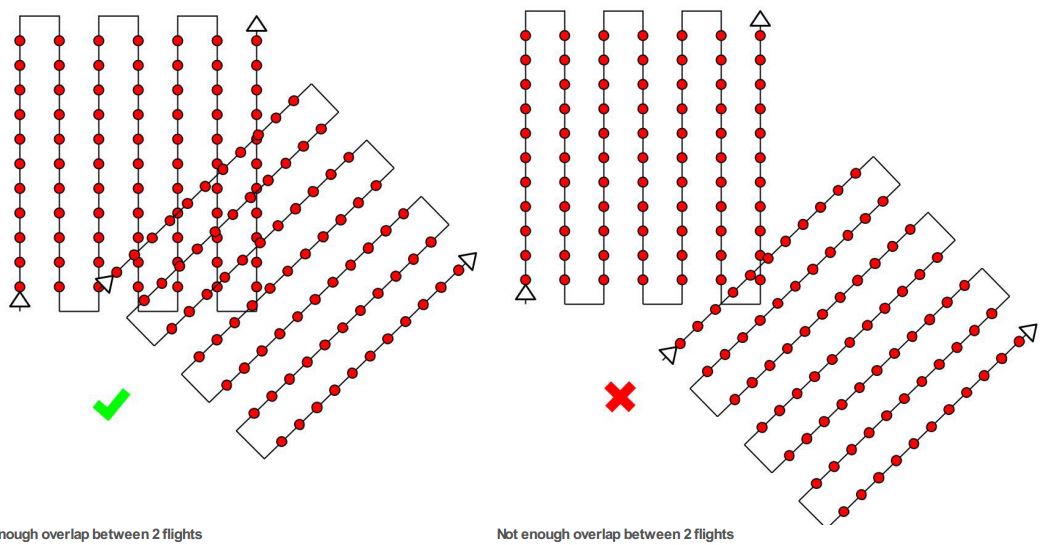 |
| Figure 3 In order
for Pix4D to process data from multiple flights, the flight path must overlap
at least as much as the diagram on the left. Source: Pix4D 3.0 user manual. |
 |
| Figure 4 The recommended image acquisition plan overlap for multiple flights. |
Can Pix4D process oblique images?
Yes. Oblique
imagery (Fig.5) is recommended for use in building reconstruction and other 3D
objects. This requires a specific image
acquisition plan which includes flying around the object a first time at a 45°
camera angle, followed by a second and third time around the building
increasing the flight height and decreasing the camera angle with each round
(Fig.6). Taking one image every 5-10 degrees is recommended to ensure enough
overlap, depending on the size of the object and distance to it. Shorter
distance and larger objects require images every less degrees.
 |
| Figure 5 Oblique imagery gives the viewer a reference to the height of an object. Source: Pix4D User manual. |
 |
| Figure 6 An example of the ideal image acquisition plan for a 3D object, such as a barn. Source: Pix4D user manual. |
Are GCPs necessary for Pix4D? When are they highly recommended?
While ground
control points (points of known coordinates in the area of interest) are not necessary for processing in
Pix4D, they are highly recommended in certain cases:
- Corridor mapping with a single track (which is to be used ONLY when a dual track image acquisition plan is not possible). This requires at least 85% frontal overlap and GCPs that are defined along the flight line in a zig zag formation.
- Images without geolocation. When images have no geolocation, Pix4Dmapper can use GCPs to locate, scale and orient the model.
- When particularly high accuracy is needed.
What is the quality report?
The quality report is automatically generated
for each project in Pix4D and can be opened by clicking Process>Quality
Report on the main tab bar. This opens a report that can be downloaded
and saved as a pdf (Fig.7).

 |
| Figure 7 The quality report pdf is generated automatically. |
This report
contains a summary of all aspects of the project, including: a preview (Fig.8), initial
image positions, computed image/GCPs/Manual Tie Points Positions, GCPs/Check
Points, absolute camera position and orientation uncertainties,
overlap, internal camera parameters (including perspective lens and fisheye
lens), 2D Keypoints Table and 2D Keypoint Matches graph, relative camera
position and orientation uncertainties, 2D Keypoint Table for Camera, a table
showing Median / 75% / Maximal Number of Matches Between Camera Models, 3D points
from 2D Keypoint Matches, Manual Tie Points, Ground Control Points, scale
constraints, orientation constraints, absolute geolocation variance, geolocation
coordinate system transformation, relative geolocation variance, and rolling
shutter statistics.
 |
| Figure 8 This image, taken from a quality report generated for the Litchfield Mine in Eau Claire, Wisconsin, shows the typical low resolution preview of the Orthomosaic and the DSM (digital surface model). They allow a visual inspection of the quality of the initial calibration. |
To see an
online example of a quality report, click here.
For more
information on quality reports, click here to see the Pix4D support page.
A Tour of Basic Functions
Processing Data
Open Pix4Dmapper and click Project>New Project. Choose a folder to save to. Select Add images and open the data files. In
this example, the data are aerial images taken by Dr. Joseph Hupy of UW Eau Claire using a DJI Phantom UAV. The
study area is the Litchfield Mine, adjacent to the Chippewa River in Eau
Claire, Eau Claire County, Wisconsin. The WGS 1984 UTM Zone 15N coordinates
system is detected automatically by Pix4D. Upon opening a new project in Pix4D,
the user is prompted with an option then to expand the project. For today’s
purposes, a simple project (the default settings) will do (Fig.9). Click
finish.
 |
| Figure 9 This menu displays options to expand the report. The basic, preselected options include a 3D model, an orthomosaic, a DSM, a 3D Mesh, and a Point Cloud. Using this information the user can measure volumes of objects, digitize objects, generate contour lines, and more. |
The flight pattern is shown via points and lines over a basemap
of the area (Fig.10).
 |
| Figure 10 |
Analysis of the quality report
After
the initial processing is done, examine the quality report.
The
following steps are recommended:
Quality Check. Verify that: all the checks are green, all or almost all the images are calibrated in one block, the relative difference between initial and optimized internal camera parameters is below 5%, and, if using GCPs, that the GCP error is below 3×GSD (Fig.11).
 |
| Figure 11 In the Litchfield Mine project report, the
Quality Check revealed that all 68 images were calibrated (meaning that none
were rejected for not overlapping enough) and Pix4D was able to automatically
generate 8553.1 matches between images in order to overlay them accurately.
A red flag was raised by the Camera
Optimization. This indicates that the focal length/affine transformation
parameters, which are a property of the camera's sensor and optics which varies
with temperature, shocks, altitude, and time, was not within 5% of the
optimized value to ensure a fast and robust optimization.
The Georeferencing raised a yellow flag
because no 3D ground control points were used, which means there may be a
decrease in accuracy of the 3D model.
|
Examine the Preview. For projects with nadir images and for which the orthomosaic preview has been generated, verify that the orthomosaic does not contain holes or have distortions. If GCPs or image geolocation has been used, make sure that it has the correct orientation (Fig.12).
 |
| Figure 12 In
the preview generated for the example project (right) compared to the aerial
image of the Litchfield Mine (left), there are no holes in the data. Few
distortions are apparent, though there appears to be an area of poor overlap in
the center, indicated in this image by the orange rectangle. This may be
because fewer photos were taken over the northern portion of the mine because there
is less relief there. |
Calculating surface area within the rayCloud editor
The
use of the rayCloud is optional and it can be used to:
- Visualize the different elements of the reconstruction and their properties.
- Verify/ improve the accuracy of the reconstruction of the model.
- Visualize point clouds / triangle meshes created in other projects or with other software.
- Georeference a project using GCPs and /or Scale and Orientation constraints.
- Create Orthoplanes to obtain mosaics of any selected plane.
- Assign points of the point cloud to different point groups.
- Improve the visual aspect.
- Create objects and measure distances (polylines) and surfaces.
- Create 3D fly-through animations (Video Animation Trajectories).
- Export different elements, such as: GCPs, Manual / Automatic Tie Points, Objects, Video Animation Trajectories.
- Export point cloud files using points belonging to one or several classes.
In order to calculate
surface area of on object, such as a sand pile, click View>rayCloud on the Menu bar (Fig.13). Note: If the image does
not resemble the figure below, then follow the steps above to process the data,
then open the rayCloud.
 |
| Figure 13 The rayCloud view indicated the area of each image that was taken along the flight path and the angle each is associated relative to the ground. |
In the left sidebar, click
rayCloud>Surface (Fig.14). The measurements
will be displayed in the right sidebar.
 |
| Figure 14 The surface box must be selected to view measurements such as projected 2D length and enclosed 3D area. |
Calculate the volume of a 3D object
In order to
create a new volume, click View>Volumes>New
Volume on the Menu bar. On the 3D View, a green point appears
beside the mouse. Left clicking the feature will mark the vertices of the base
surface of the volume. With each click a vertex is created and the volume base
surface is formed. Right clicking indicates that the feature is encircled and
creates the volume base. On the sidebar, click Compute to
compute the volume (Fig.15). For further instruction on this, click here.

 |
| Figure 15 This compilation of images shows the sequence of steps to compute the volume of an object in Pix4D. The calculations are displayed in image 4. |
How to
export a volume
On the Menu
bar, click View > Volumes. On the
sidebar, in the Objects section, click the symbol that resembles a square with
an outward-facing arrow. Click All to
select all Volumes to be exported, click None
to unselect all Volumes or select the checkbox on the left of each Volume to
select some of the Volumes to be exported (Fig16). Click export and save the
image as a .shp file in order to open it in ArcMap (Fig.17). The metadata will
need to be added manually.
 |
| Figure 16 The export symbol is indicated by the arrow. |
 |
| Figure 17 The shape files can be imported in Arcmap for map making. |
Overview
This concludes the brief overview of a few of the basic functions that can be
performed using Pix4D software.
Further information can be found at:

Offline Getting Started and Manual

Articles on how to use the rayCloud
No comments:
Post a Comment